
The video above is from an older version of the course. You might find it helpful to watch it as an example of prototyping a workspace, but you don't have to follow along. See the Exercise below for details.
The video above is from an older version of the course. You might find it helpful to watch it as an example of prototyping a workspace, but you don't have to follow along. See the Exercise below for details.
After completing this lesson, you’ll be able to:
We're going to do something different for this exercise. You have an option:
Scenario
Your city government has the following datasets available in the starting workspace:
Your task is to create a workspace that:
The steps below can be used as a guide to prototype an approach to this problem.
To develop this workspace, we must consider what steps might be required. We can then create sections with bookmarks and fill them in as we go along.
Let's plan your workspace together.
What data will you start with? What format and schema?
What data will you end with? What format and schema?
What steps might you need to take between reading and writing? You might need to:
Write the list of actions your workspace will carry out in as much detail as possible. Here's an example from a different scenario:
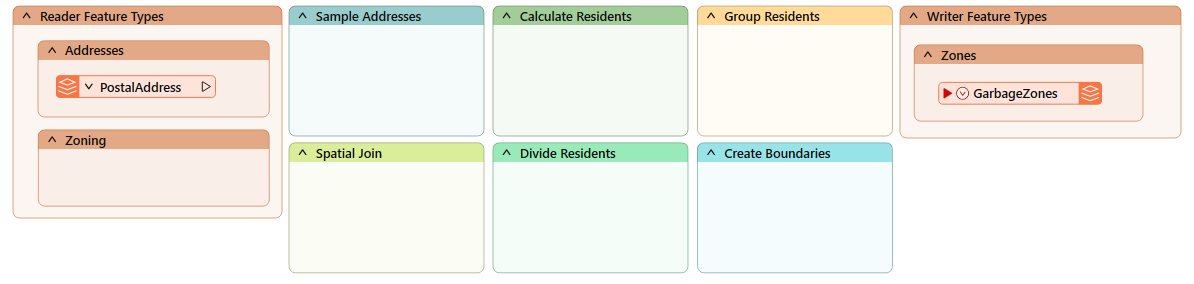
Add the reader(s) and writer(s) you plan to use and their feature types. If you started with the workspace included in this lesson, the readers and writer have already been added.
It's better to start small and add a single reader and writer feature type; you can continually expand the workspace later.
Observe their schemas and note if any schema changes are required.
Choose a feature type definition mode when adding your writer that will help you define the destination schema as quickly as possible:
- Automatic: This adds a new feature type with the attribute definition parameter set to Automatic, which is the default.
- Choose this mode if you'd prefer to read your data in, modify the schema as you go, and then write out whatever you end up with.
- Manual: Adds a new feature type with the attribute definition parameter set to manual.
- Choose this mode if you want to specify the destination schema beforehand precisely.
- Copy from Reader: Adds a new feature type with the attribute definition parameter set to manual but predefined to the schema of an existing Reader feature type.
- Choose this mode if the destination schema will be the same or similar to the source schema.
- Import from Dataset: Adds a new feature type with the attribute definition parameter set to manual but predefined to the schema of an external dataset (just like using the Import Feature Types tool).
- Choose this mode if you have to meet exact requirements for writing based on an existing schema in another dataset.
- Dynamic: Adds a new feature type with the attribute definition parameter set to dynamic.
- This mode is more advanced; choose it if you need to write out whatever you receive when the workspace runs without knowing the schema.
- None: Does not add any new feature type.
- You shouldn't choose this mode if you want to write out data.
Begin to plan your workspace by adding bookmarks to the Canvas representing the steps you will take.
You can't know which sections will be larger in advance, so make all bookmarks the same size.
Here's an example from a different scenario, continuing from the list of actions above:
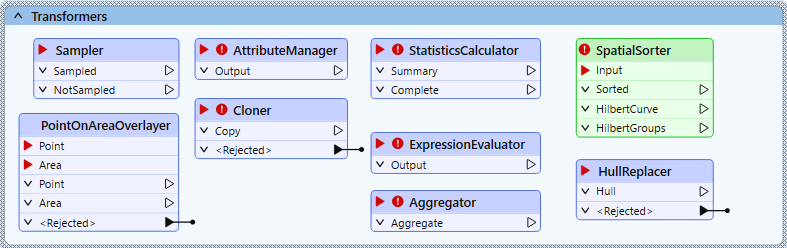
Consider the transformers you want to use. You can begin by working section-by-section or adding as many transformers as needed. The latter approach can be helpful, as you can have the different options available and try them out individually.
Here's an example of transformers that the author might need for the above workspace:
You should only read a sample of the source data to ensure your workspace runs quickly while prototyping.
As detailed in the previous lesson, there are many ways to do this, depending on your situation:
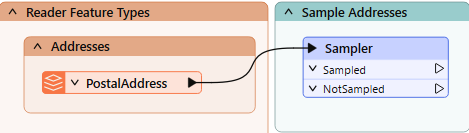
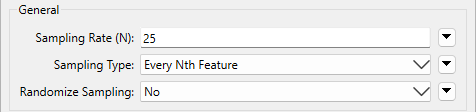
Continuing the example above, we may want to sample every 25th address while authoring our workspace. We can add a Sampler transformer:
And configure it like this:
Run the workspace to ensure FME samples the data correctly. Inspect your sampled data to ensure it is a small dataset (say, less than 1,000 features, depending on feature size) and has the correct variation in values you might expect from your data.
Now that you have an outline of your workspace and a sample of the data, save the workspace.
Include a date or version number (like GarbageCollection-2024-05-18.fmw).
If you use a version control system, practice committing a workspace with a meaningful commit message.
If you have time, you can continue building your workspace section by section. Remember, the goal of this exercise is not to complete the workspace, but to practice prototyping a workspace. Each time you add a transformer, run the workspace to update feature caches, inspect the most recent cache, and determine if you made the correct decision. If so, proceed to add the next transformer. If not, change the parameters or try a different transformer. Read the transformer Help documentation if you get stuck.
If you are taking a Safe Software-hosted training course, consider sharing what you learned as you prototyped your workspace in the chat. What problems did you encounter?
You can also back up your workspace prototype on your virtual machine for further development by emailing it to yourself or uploading it to a file-sharing system.